Ever had a ceiling fan pullchain break off while you were pulling on it? It does happen, and potentially, this could be the reason you’re at this page now! Pullchains can be the worst when they break off, because you lose full functionality of the fan. If your fan has no remote, you’re likely on this page now looking for a replacement pullchain. We have some replacement Harbor Breeze pullchains available on this page. We are not the manufacturer.
How to install a replacement fan pullchain
Materials Needed:
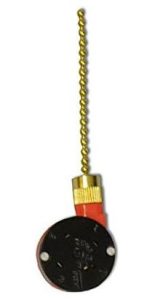
- Replacement pull chain
- Wire stripper
- Screwdriver
- Needle-nose pliers
- Voltage tester (optional)
- Wire nuts (optional)
Step 1: Turn Off Power
Before starting any electrical work, ensure your safety by turning off the power to the ceiling fan at the circuit breaker. Use a voltage tester to double-check that there is no electricity flowing to the fan.
Step 2: Remove the Old Pull Chain
Locate the housing or cover that conceals the fan’s wiring. Typically, this is found at the center of the fan, beneath the blades. Use a screwdriver to remove the screws securing the cover and expose the internal components.
Identify the pull chain switch and disconnect the wires attached to it. This may involve removing wire nuts or loosening screws, depending on the fan model. Once detached, carefully pull the old pull chain switch out of the housing.
Step 3: Prepare the New Pull Chain
Compare the old and new pull chain switches to ensure they are compatible. If they match, strip about half an inch of insulation from the ends of the wires on the new pull chain.
Step 4: Connect the New Pull Chain
Attach the wires of the new pull chain switch to the corresponding wires within the fan. The wires are typically color-coded (black or blue for the hot wire, white for the neutral wire). Use needle-nose pliers to secure the connections, and if necessary, use wire nuts to ensure a tight fit.
Step 5: Secure the New Pull Chain Switch
Carefully place the new pull chain switch into the housing, making sure it fits securely. Replace the cover and tighten the screws to secure it in place.
Step 6: Test the Ceiling Fan
Turn the power back on at the circuit breaker and test the functionality of the new pull chain switch. Ensure that it operates smoothly, controlling the fan’s speed or light as intended.
Eventually, you may have to get in touch with Home Depot or Lowe’s customer support in order to obtain more pullchains then what is listed here. If you are looking for a pullchain for a specific Harbor Breeze fan, or other brand, please get in touch to let us know. We will take a look for the particular pullchain you are looking for, and let you know if we are able to locate the part you need.