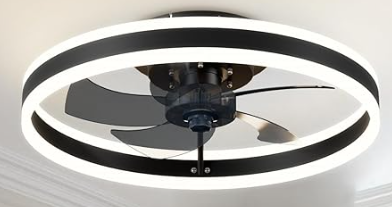
A recessed false ceiling fan refers to a ceiling fan that is installed within a recessed or dropped ceiling. A false ceiling, also known as a dropped ceiling or suspended ceiling, is a secondary ceiling suspended below the main (structural) ceiling. It creates a space between the two ceilings, often used for various purposes such as hiding wiring, providing insulation, or improving acoustics.
A recessed false ceiling fan is designed to be installed within this dropped ceiling, typically in a way that the fan’s motor and blades are hidden from direct view. This type of installation can provide a more integrated and aesthetically pleasing appearance, as the fan becomes a seamless part of the ceiling. The fan’s airflow, however, is still able to circulate effectively within the room.
It’s worth noting that the term “recessed false ceiling fan” might not be a standard industry term, and actual product names or descriptions may vary. Always refer to the specific product details and installation instructions provided by the manufacturer for accurate information on any particular ceiling fan model.
How to install a recessed false ceiling fan
Certainly, let’s expand on the installation steps:
Materials and Tools:
– Recessed false ceiling fan kit
– Ladder
– Power drill
– Screws
– Screwdriver
– Wire stripper
– Voltage tester
– Ceiling fan mount box
– Wiring connectors
– Wire nuts
– Pliers
Installation Steps:
Choose the Right Location:
– Identify a suitable location for the fan within the false ceiling structure, ensuring it is centered for optimal air circulation. Consider factors like room layout and the placement of other fixtures.
Prepare the False Ceiling:
– Determine the dimensions of the fan housing and cut an opening in the false ceiling based on the manufacturer’s specifications. Use caution to avoid damaging existing structures or wiring during this process.
Install the Mounting Box:
– Securely install a ceiling fan mount box within the opening. Ensure it is well-supported and capable of handling the weight of the fan. Follow the manufacturer’s guidelines for attaching the box securely to the ceiling structure.
Mount the Fan Motor:
– Attach the fan motor to the mounting box according to the manufacturer’s instructions. This typically involves using screws to secure the motor in place. Make sure the motor is stable and well-balanced.
Connect Electrical Wiring:
– Use a wire stripper to expose the necessary length of wires. Connect the fan’s wiring to the electrical supply using wiring connectors and wire nuts. Double-check the connections and use a voltage tester to ensure the power is off before making any electrical connections.
Secure Fan Blades:
– Attach the fan blades to the motor following the manufacturer’s instructions. Ensure that each blade is securely fastened, and the blades are balanced for smooth operation.
Install the Fan Cover or Grille:
– Attach the fan cover or grille as per the manufacturer’s instructions. This step gives the finishing touch to the installation, hiding the fan assembly within the false ceiling.
Test the Fan:
– Before completing the installation, turn on the power and test the fan to ensure it operates correctly. Check for any unusual noises or vibrations.
Remember to consult the specific installation manual provided by the fan manufacturer, as the steps can vary between different models. If you are uncertain about any step, or if the installation involves complex electrical work, it’s advisable to seek professional assistance.