We have had many requests for installation instructions and/or owner’s manuals for certain model ceiling fans. However, in most cases, assembling and installing a fan is very standard. Most fans have very similar parts and therefore are put together in much the same way.
It should be noted that it is recommended the outlet box/and or support be rated for a weight greater than the actual weight of the fan. You also have to factor in the centrifugal force of the rotating blades, and allow for any vibrations, etc. A fan that weighs 25lbs or so is usually recommended to have a support rated for 30-40lbs or more. But in any case, in order to have a legal installation, the fan (and outlet box) should be attached to ceiling joist or rated fan brace. If the outlet box is loose or unsupported you will need to brace it further.
Anyone with a bit of mechanical and electrical aptitude should have no problem installing a fan. However if you are in a situation where there is not already an existing power supply and support, you might want to call a professional if you are not comfortable and knowledgeable working in this area.
This is a great step by step video, to assist you with your ceiling fan installation:
Ceiling Fan Installation Instructions
1. Some pieces of the fan require assembly before hanging. Attach the blades to the blade brackets. In the case of a downrod fan, slip the canopy over the downrod and attach the downrod to the fan. In the case of a close mount (not hugger) fan, attach the canopy directly to the motor. In some cases you may want to attach the light fitter (should one apply) to the motor before assembly, in other cases it will be easier to attach once the fan is on the ceiling. Some fans also require the switch housing be plugged in and attached. In any case, at this point the fan should consist of 3 or 4 types of pieces: the motor assembly, the mounting bracket, the blades, and, if applicable, the light attachments.
2. Attach the mounting bracket to the fan brace and/or ceiling outlet box.
3. Hang the motor assembly from the mounting bracket. In some cases this will be via a small hook, in other cases the ball on the end of the downrod will fit directly in the bracket. Be sure the groove in the ball lines up with the tab in the bracket and/or canopy.
4. Connect the wires. Refer to the Ceiling Fan Wiring Guide for more information.
5. Attach the canopy to the mounting bracket. In the case of some fans this may be 2 thumbscrews on the bottom, others may have as many as four screws on the side. In close-mount fans and some downrod fans the canopy is load bearing, in other cases it is purely decorative. In downrod fans be sure the ball is (still) lined up with the tab in the bracket/canopy. If the canopy has a decorative ring to cover the screws, attach that.
5a. For hugger fans, attach the motor to the mounting bracket, in most cases with four locknuts (some fans may vary). Attach the motor housing cover to the mounting bracket (usually with four screws).
6. Attach the blades to the motor via the blade brackets. Each blade bracket uses two screws which fit directly to the motor or the flywheel.
7. Attach the light fitter, if applicable and if it has not already been attached. Attach the glass to the light kit, and any other decorative accessories the fan may include.
My Experience Installing the Hunter Dempsey Ceiling Fan
Recently, I decided to upgrade my bedroom with a new ceiling fan and chose the Hunter Dempsey model for its sleek design and functionality. As someone who enjoys tackling DIY projects around the house, I was both excited and a bit apprehensive about installing it myself. Here’s a detailed account of my experience with the installation process.
Preparation
- Gathering Tools and Materials: Before diving into the installation, I made sure to gather all the necessary tools and materials. For the Hunter Dempsey fan, I needed a screwdriver, a ladder, pliers, wire cutters, and a voltage tester. I also laid out all the components of the fan—blades, light kit, mounting bracket, and remote control—to ensure I had everything at hand. The clear instructions included in the manual were a big help in organizing everything.
- Turning Off the Power: Safety is always my top priority, so I made sure to turn off the power at the circuit breaker before starting. I used a voltage tester to double-check that the wires were not live, which gave me peace of mind as I worked on the installation.
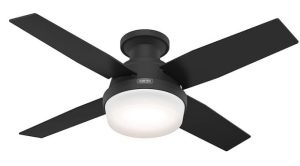
Hunter Dempsey Ceiling Fan
Installation Process
- Mounting the Bracket: The first step was to install the mounting bracket. The Hunter Dempsey fan came with a robust bracket that needed to be securely attached to the ceiling. I used the screws provided and made sure the bracket was level. The instructions were straightforward, and the process went smoothly. Having a second pair of hands would have been helpful here, but I managed to get it done on my own with a little maneuvering.
- Assembling the Fan: With the bracket in place, I moved on to assembling the fan itself. The Hunter Dempsey has a unique design with integrated LED lighting and a sleek motor housing. I carefully attached the motor to the bracket, making sure all the connections were secure. The fan blades were next, and I appreciated how the instructions provided clear guidance on the blade attachment process. The blades fit snugly into place, and the overall assembly felt solid and well-made.
- Wiring the Fan: The wiring process was straightforward. The Hunter Dempsey manual included a simple diagram that showed how to connect the wires correctly. I followed the color-coded wiring instructions and made sure to use wire nuts to secure the connections. This part of the installation was crucial, so I took my time to ensure everything was connected properly.
Final Steps and Testing
- Attaching the Light Kit: Once the fan was wired and assembled, I attached the light kit. The Hunter Dempsey’s integrated LED light is one of its standout features, and it was easy to install. The glass shade and bulb holders were secured with a few screws, and the light kit was seamlessly integrated with the fan.
- Testing the Fan: After double-checking all connections and ensuring everything was securely attached, I turned the power back on at the circuit breaker. I used the remote control to test the fan’s functionality. I was relieved to see that it worked perfectly on the first try. The fan operated smoothly and quietly, and the light provided the bright illumination I was hoping for. The remote control made it easy to adjust the fan speed and light settings, adding a convenient touch.