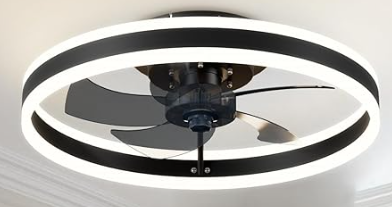
What is a recessed false ceiling fan?

Low Profile Recessed LED Ceiling Fan

A recessed false ceiling fan refers to a ceiling fan that is installed within a recessed or dropped ceiling. A false ceiling, also known as a dropped ceiling or suspended ceiling, is a secondary ceiling suspended below the main (structural) ceiling. It creates a space between the two ceilings, often used for various purposes such as hiding wiring, providing insulation, or improving acoustics.

A recessed false ceiling fan is designed to be installed within this dropped ceiling, typically in a way that the fan’s motor and blades are hidden from direct view. This type of installation can provide a more integrated and aesthetically pleasing appearance, as the fan becomes a seamless part of the ceiling. The fan’s airflow, however, is still able to circulate effectively within the room.

It’s worth noting that the term “recessed false ceiling fan” might not be a standard industry term, and actual product names or descriptions may vary. Always refer to the specific product details and installation instructions provided by the manufacturer for accurate information on any particular ceiling fan model.

How to install a recessed false ceiling fan

Certainly, let’s expand on the installation steps:

Materials and Tools:
– Recessed false ceiling fan kit
– Ladder
– Power drill
– Screws
– Screwdriver
– Wire stripper
– Voltage tester
– Ceiling fan mount box
– Wiring connectors
– Wire nuts
– Pliers

Installation Steps:

Choose the Right Location:
– Identify a suitable location for the fan within the false ceiling structure, ensuring it is centered for optimal air circulation. Consider factors like room layout and the placement of other fixtures.

Prepare the False Ceiling:
– Determine the dimensions of the fan housing and cut an opening in the false ceiling based on the manufacturer’s specifications. Use caution to avoid damaging existing structures or wiring during this process.

Install the Mounting Box:
– Securely install a ceiling fan mount box within the opening. Ensure it is well-supported and capable of handling the weight of the fan. Follow the manufacturer’s guidelines for attaching the box securely to the ceiling structure.

Mount the Fan Motor:
– Attach the fan motor to the mounting box according to the manufacturer’s instructions. This typically involves using screws to secure the motor in place. Make sure the motor is stable and well-balanced.

Connect Electrical Wiring:
– Use a wire stripper to expose the necessary length of wires. Connect the fan’s wiring to the electrical supply using wiring connectors and wire nuts. Double-check the connections and use a voltage tester to ensure the power is off before making any electrical connections.

Secure Fan Blades:
– Attach the fan blades to the motor following the manufacturer’s instructions. Ensure that each blade is securely fastened, and the blades are balanced for smooth operation.

Install the Fan Cover or Grille:
– Attach the fan cover or grille as per the manufacturer’s instructions. This step gives the finishing touch to the installation, hiding the fan assembly within the false ceiling.

Test the Fan:
– Before completing the installation, turn on the power and test the fan to ensure it operates correctly. Check for any unusual noises or vibrations.

Remember to consult the specific installation manual provided by the fan manufacturer, as the steps can vary between different models. If you are uncertain about any step, or if the installation involves complex electrical work, it’s advisable to seek professional assistance.

Replacing a cracked glass globe

Replacing a globe that now has cracked glass, is actually a very common issue with many ceiling fan owners and enthusiasts. When it comes to replacing a glass globe for a Hampton Bay ceiling fan, in particular, the job can sometimes become more challenging. Many Hampton Bay ceiling fan owners report that they do into a local Home Depot store, and not able to find the required replacement glass globe that they need.
Home Depot is the only carrier of Hampton Bay fans. They pretty much own the brand, more or less, so they are the people at the end of the day that you have to get help from. Why is this? Because Home Depot has solidified themselves as the only ones to carry these parts, we simply aren’t able to source them. Home Depot does not share any of the part availability with any other retailer whatsoever.

Obtaining support from Home Depot

If you need to call Home Depot to get help finding a replacement glass globe, you can call 1-877-527-0313. We have not verified if this phone number works all over the phone, but being a 1-877 # it should. Home Depot operates the help line from 8 AM – 6 PM EST, closed Saturday and Sunday.
In scouring the Internet, website visitors and other ceiling fan enthusiasts report that this is usually the most streamline way to find the part you need. Home Depot maintains a directory of all of their parts within a computer system, so usually they can find the part you need quickly from part number, model number or other.

Cost of Replacement Glass Globes

Many site visitors have complained, that the store sales person at Lowe’s “tried to sell me a new fan!” Well, guess what. After you’re done paying for the replacement glass globe, with the shipping (and possibly customs), you’ll end up paying half the value of the fan (or more). If you paid $100 or less for your fan, we’d highly recommend you simply buy a new one. Glass globe replacements range anywhere from $50-$150, plus the shipping. So many times, you may end up paying half the value of the fan or more for a replacement glass globe.

Where can I find a 6 speed ceiling fan remote?

My ceiling fan has 6 speeds and I need a new remote for it. Where can I find a 6 speed ceiling fan universal remote?

We’ve had a number of website visitors ask us where can I get a 6 speed ceiling fan remote. We’d love to help out, but we have not been able to locate a suitable 6 speed universal remote replacement. If you know a place that sells a suitable 6 speed ceiling fan remote, that is universal and works with multiple brands/makes, please let us know. We have been able to find specific 6 speed remotes for different manufacturers, but they only work with select fans and not universally. For instance, you can buy an Emerson 6 speed ceiling fan remote but it only works with select Emerson receiver models.

One idea may be to try rewiring the receiver, or to purchase a universal kit which has a receiver that comes with it. Whether or not you can re-wire a 6 speed fan to work as a 4 speed fan, is a question we don’t have the answer to at this time. In fact, while some users might recommend this, we typically do not. It may be a good idea to call your local Home Depot or Lowe’s and ask them if they are able to source the part.

What Does it Cost to Operate a Ceiling Fan?

What Does it Cost to Operate a Ceiling Fan?

It costs only three tenths of one cent per hour ($0.0029) to operate an energy efficient ceiling fan such as the Emerson Midway Eco (shown to the left) and about 3 to 5 times that for typical ceiling fans that are less efficient. Even the worst energy guzzling ceiling fans on the market will only cost you less than 2 cents per hour to run. These costs are virtually negligable, which explains why ceiling fans are such a great energy saving alternative to air conditioning.

Calculating the cost to operate a ceiling fan is a simply a matter of knowing how many watts the fan uses and multiplying that by the cost per kWh of electricity you are being charged by your utility company. This will give you the cost per hour to run the fan. The range of wattage between various brands and models of ceiling fans (without lights) is anywhere from 12 watts to 120 watts per hour. Based on that, here is how much it would cost to operate the most and least energy consuming ceiling fans on the market if either fan was left running 24 hours a day for an entire year. No one is likely ever to use their ceiling fan even remotely close to that many hours, but I am taking these calculations to an extreme just to show how cheap it is to run even the worst fan.

  1. Fan #1 – Super Efficient Ceiling Fan at 12 Watts = $12.61 per year
  2. Fan #2 – Average Ceiling Fan at 60 Watts = $63.07 per year
  3. Fan #3 – More Powerful Ceiling Fan at 120 Watts = $126.14 per year

So, the most it can cost you to run a ceiling fan without lights is about $126 per year, which is equal to about $10 per month and the least it will cost you is $12 per year, which comes out to just $1 per month…which in either case, is amazingly cheap.

Ceiling Fans with Lights

The above calculations did not consider having a light fixture on the ceiling fan. The range of wattage for a ceiling fan including lights is somewhere around 76 to 360 watts, which is a much more dramatic difference. Here are the calculations for those numbers:

  • Fan #4 – Super Efficient Ceiling Fan with Lights at 76 Watts = $79.89 per year
  • Fan #5 – Average Ceiling Fan with Lights at 60 Watts at 180 Watts = $189.22 per year
  • Fan #6 – More Powerful Ceiling Fan with Lights at 360 Watts = $378.43 per year

The numbers for fan #4 above are those from the Emerson Midway Eco, which is the most efficient ENERGY STAR qualified ceilign fan on the market that comes with a light. The light fixture built-in to the Eco fan uses 4-13 watt Compact Fluorescent bulbs for just 52 Watts that is equivalent to over 100 watts of incandescent light. Add the 26 watts the fan motor uses for a total of 76 Watts. Fan #6 could be any number of less efficient ceiling fans with a 4 light fixture and uplight that uses incandescent bulbs. So the lighting would be around 240 watts and the motor at 120 watts for a combined total of 360 Watts.

So the conclusion I am hoping that you will make here is that the light fixture you choose for your ceiling fan is what will cost you the most in the long run. Keep in mind that these estimates above are for operating each ceiling fan 24 hours a day for 365 days…so you can cut those numbers by about 75% or more to come to a more realistic usage.

Ceiling Fan Operational Cost Calculator

The calculator that you see below can be found on all of our ceiling fan detail pages where the wattage for the fan is available. In this example, we have initially plugged in the specifications for the Midway Eco Fan which uses just 24 Watts of electricity on high speed with the light off, and 76 Watts with the light turned on. As you can see, the calculated cost to operate the fan with lights off is only $0.0029/hr. If you re-calculate it with the lights turned on, the cost increases by about 300% to $0.0091, but is still less than a penny per hour. So the first lesson to be learned here is that in almost all cases, the light fixture on a ceiling fan uses far more electricity than the fan motor itself. This fan will give us a good foundation for testing the range of costs between ceiling fans, which you can do by clicking the various buttons below the calculator.

What does it cost to operate this ceiling fan 24 hours per day?
Fan Watts Cost of Electricity/kWh
(Enter your cost per kWh or select your state)
Hours/Day Days/Year

$
hours days
w/Lights (52 Watts)

Hourly Cost $ /
Yearly Cost $

Basic Help: Our cost usage calculator shows you how much it will cost to operate the ceiling fan. By default, the calculator assumes that you will leave your fan running 24 hours a day for the entire year (which is not very likely to be accurate), so you will want to change the hours and days to be more in line with how often you think you will use the fan. The calculator also defaults to the average cost per kWh of electricity in the USA. You can change this to use the average cost of electricity in your state, although this may vary widely from city to city. For the most accurate calculation, manually enter the actual cost/kWh shown on your utility bill. The wattage of the fan is already included (if it is known), but you can change it if you wish to see how the wattage affects the cost.

Fans with lights: Calculations are performed without lights by default. If you add a light fixture to the fan, you can add the wattage of the fixture to the wattage of the fan to perform calculations with the lights on. In some cases, when a light fixture of known wattage is included with the fan, the option to calculate with or without lights will show automatically. The light fixture on a ceiling fan almost always uses substantially more electricity than the fan motor, so it is very important to take that into account when comparing the overall operational cost between various ceiling fans

CFM -vs- Efficiency: CFM is KING! It is more important to buy a fan with higher CFMs than it is to buy a fan that uses less electricity. The highest wattage consumed by the most energy guzzling ceiling fan on our website is about 120 watts. So if you input 120 as the fan watts and run our calculator, you will see that it still costs less than 2 cents per hour to operate the most energy guzzling ceiling fan in most states. You will get more savings with a higher CFM fan than a lower Wattage fan because if your fan moves more air you will be able to raise your thermostat to a higher degree. Raising your thermostat by 10 degrees can save you up to 40% on your cooling bills. Choosing a less powerful fan because it uses less electricity can be the worst mistake you can make because it will not cool you off enough to allow you to raise your thermostat to a high enough level without becoming uncomfortable. This is why CFM is so much more important to consider than Wattage.

The average kWh by state used by our calculator is derived from information published by the US Government Department of Energy as of May 2009. Your actual cost may differ from this. Again, refer to your utility bill for your most recent kWh cost.

Why are my ceiling fan blades turning yellow?

Why are my ceiling fan blades turning yellow?

What you will need to effectively remove the yellow tar & nicotine stains yourself:

  • Oven Cleaner
  • De-greasing agent
  • Bucket
  • Screwdriver to take apart the fan & blades
  • Ladder to climb up to the fan and remove
  • Rubber gloves to protect against the oven cleaner and other chemicals

Are you a smoker? The most common reason why a ceiling fan’s blades will change to yellow is from cigarette smoke. Cigarette smoke has a chemical in it called nicotine. Nicotine actually will change a smoker’s fingers from white to yellow at the tips. Smokers also wind up with yellow teeth – this is stains from the nicotine. In some people, they can use whitening or other to get rid of the yellow teeth – if they are able to cut down on the smoking, or quit.

Unfortunately, removing the yellow nicotine stains from your ceiling fan will not be as easy as using whitening toothpaste. To remove yellow ceiling fan stains, use an over cleaner. We know, right? An over cleaner? But it does actually do the job. Just keep in mind, breathing the stuff in can be bad for you. So it’s best to work in an open area with lots of ventilation when you are doing this.

Ok, so you’ve got an area with open ventilation – check. Next, you’ll want to take the blades off the fan (disassemble). Once you do that, saturate each of the fan blades in the oven cleaner fluid. You can do this by using a bucket or other. Saturate the blades in the oven cleaner for some time – 10 to 20 minutes at least. Rinse the blades off. After that, saturate the blades in a degreasing solution, and again rinse after that. Rinse, and lightly wipe with cloth/sponge (very lightly). This should help to remove tar and nicotine stains from your fan.

Pull Chain Light Fixture Not Working – How Do I Fix It?

I have a newer Hampton Bay ceiling fan, which has an attached light fixture. The pull chain is working ok for the fan. But the pull chain I have for the light is not working. What should I do?

You’ll need to remove the light kit from the fan, and take out the light switch inside. First, shut off the power running to the fan. You can do this from the circuit panel in your home.

Once the power is shut off, look at the base of the fan where the light kit is attached. You’ll have to remove the light switch. However, make sure you take note first of what’s attached where. It’s a good idea to make a diagram of what’s connected where, because you’ll need to connect a new switch in place of the old one.

You can take the detached piece to your local hardware store, lighting store or other. Home Depot, Lowe’s, Home Hardware and other stores like that should work just fine. The switch does not have to belong to a Hampton Bay ceiling fan – generally, you can get a universal switch or etc. If you take the existing switch and housing to a local store, some of the staff there may recognize a replacement if they’ve been there long enough (or have a fairly good trade education).

Hook up the same switch to match the existing switch

If you have a two wire switch, you’ll need another of the same. If you have a three wire switch, you’ll need another of those. You get the idea. As noted previously, ensure that you took a sketch, drawing, diagram or picture of your existing switch housing. This is of the utmost importance, so you know how to hook it back up again.

I have a Hampton Bay 3 globe ceiling fan, from Home Depot. One set of the metal clips that holds the globe on broke apart. I now need another clip for the globe. I am looking for the Hampton Bay Lyndhurst ceiling fan as it has the same clips. Can you help?

I have a Hampton Bay 3 globe ceiling fan, from Home Depot. One set of the metal clips that holds the globe on broke apart. I now need another clip for the globe. I am looking for the Hampton Bay Lyndhurst ceiling fan as it has the same clips. Can you help?

Hello there, thank you for your question. Unfortunately we are not able to provide the clips themselves for the fan you are looking for. We do have the fan itself on the Hampton Bay page. So you can buy that to get the clips or any other part of the fan that you need. Of course, it may not make sense to purchase the fan only to use the clips. If you need some other parts of the fan too, like a fan blade, a motor, etc. then it may make more sense to purchase this fan for that purpose.

The Hampton Bay Lyndhurst Ceiling Fan is quite a lovely fan, if you are looking to purchase a new fan. The fan is available in two finishes: matte black, and brushed nickel.

How to Troubleshoot Casablanca Ceiling Fans

How do I troubleshoot a Casablanca Ceiling Fan?

Below are point form notes for troubleshooting your Casablanca ceiling fan. Please do check out our page on general ceiling fan troubleshooting, as most of this information comes from there. Our general troubleshooting guide has all of the steps you should try when experiencing fan related issues.

Fan Not Working

    • Check controls on fan are set correctly
    • Pullchain should be set to a speed (low/medium/high)
    • Check reverse switch
    • Remote has battery securely in place, and have tried changing the battery as required
    • Check if light kit is working
    • Do blades turn freely

If light kit is not working AND the Casablanca fan is not working

    • Connection issue: check all wires are connected inside the housing.
      See wiring guide
    • Check there is power from the supply – could be a switch or breaker that is off, or connection issue with the wiring
    • Open switch housing, check white wire is connected to both the light kit and the fan components

If light kit is working and fan is not

    • Is the black wire disconnected inside the canopy?
    • If connected, what is it connected to?
    • Fan motor could be on a seperate circuit and may not be receiving power/amperage
    • Check in the switch housing too. Ensure no wires are disconnected and/or loose

Do blades turn freely

    • Problem could involve stuck bearings. See our page on oiling, also check flywheel page for more information
    • Is it something stuck in the path of the blades, or the motor?

Why Use Ceiling Fans?

Why use ceiling fans in an industrial or commercial setting, or any other large open space? The short and simple answer: they can not only make people more comfortable, but save an astonishing amount of money.

Most larger rooms have ceilings of 12′-40′, or greater. Warmer air positions itself at ceiling level, and so it is not uncommon for the temperature at the ceiling to be 20 or 30 degrees greater than at people level. So if you are heating a room to 65 degrees, the ceiling area may be as warm as 95 degrees, and you are in fact paying to heat the room to an average of 80 degrees. Ceiling fans push the warmer air and wasted heat down to people level, and mix the air throughout the room so it is an even temperature. The even distribution also takes some additional workload off the HVAC system, and reduces drafts. Fans placed near doors and other opens repel cold air from entering. Heat from lighting and machinery is recirculated and used, rather than wasted. The result can be a heating energy savings of 30% or more.

In the summertime, fans are used at slightly higher speeds so that the breeze can be felt by people below, and to force ventilation of warm air. Studies have shown that evaporative cooling can lower skin temperature up to 7 degrees, allowing thermostats to be raised with no loss in comfort. Circulation by fans eliminates cold pockets of air and heat build-up, and takes the majority of the circulating load off the HVAC system. It has been established that problems with compressors consistently freezing up can be eliminated with added circulation from ceiling fans. The result is that you not only decrease your cooling bills, but greatly increase the life of your equipment. Fans also repel warm air from doors and other openings, deter bugs, speed the evaporation of moisture, prevent dust from settling, and eliminate stale air. Studies have shown a cooling energy savings of 50% or more, along with improved shelf life of merchandise.

Many establishments have attempted ceiling fan systems before, and not seen such favorable results.  This is usually due to a combination of two things:  ineffective fans, improperly installed and/or operated.  Fans should be evenly installed over the entire building.  Most quality manufactures publish data on exactly how much square footage is covered per fan, depending on operating speed.  Install additional fans near doors, loading docks, and other large openings, and over people-heavy areas where more body heat will be generated.  Fans should run 24/7 as long as the building is in use.  For heating, set fans to run at the fastest speed possible without creating an uncomfortable breeze or draft.  In the summertime, set fans to run at higher speeds with as much of a breeze as is tolerable.  Choosing quality fans is extremely important, this site has several recommendations we stand behind to ensure an effective fan system.  See “Industrial Ceiling Fans Brand Guide” and “HVLS Fans“.

Not just studies, but real life examples have shown that a quality ceiling fan system can pay for itself in anywhere from a short few months to one year.  Quality fans require no maintenance and will last for decades.  I think you will agree that a ceiling fan system is an investment that will offer great returns.